If you ask what exercise you should master for the rest of your life, we’re gonna say it’s the squat. It’s a full-body exercise, and it addresses far more muscles than the glutes, which is what the squat is known to do.
It’s a dynamic and powerful movement that almost anyone can do, if modified properly. You can build on it, too, so there is always room to progress.
Today, we’re covering the benefits of squats, the basics of how to do them properly and we’re giving YOU a challenge. Are you up for it?
Why the squat benefits the entire body
The squat might seem like a booty-centric exercise, and it totally is. Truly, though, it works pretty much every muscle in the body. A properly executed squat will actually release hormones – the human growth hormone and testosterone, to be precise – which help our bodies to build muscle.
In essence, squatting can help us to build muscle as we do other exercises. It’s pretty cool, and that’s part of the reason why we think this is the exercise you should master above the rest.
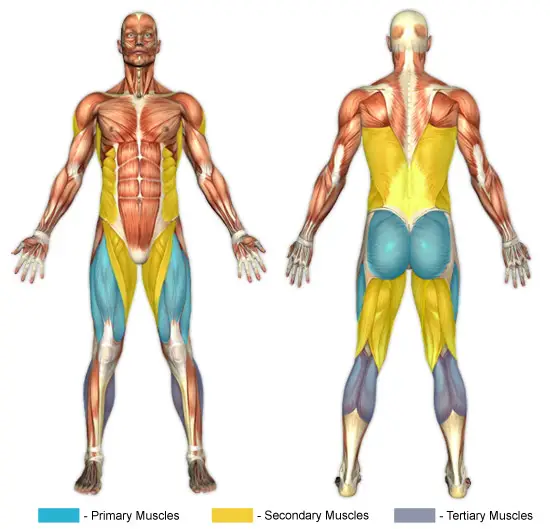
- Glutes. Your bum is one of the two primary muscle groups that the squat works. When you come up from a proper squat, the glutes should be tight and engaged, like you’re squeezing them together. You will feel it the next day!
- Quads. This is the other primary group of muscles you’ll engage. You want to power up your squat by making sure your quads are doing much of the work.
The squat also begs you to keep your core tight and your back/shoulders straight. While this is mostly important for proper form and avoiding injury, it can help strengthen your core.
Squats also improve mobility in the ankles, knees and hips. If you practice the squat enough, you’ll begin to understand where your weakness lies! Hitting depth is more a matter of mobility than it is strength, so increasing flexibility and range of motion are a huge benefit of many exercises.
It’s a great anti-aging exercise too, as squatting is a movement that we perform in our daily life, and you want to be able to do it without aches and pains well into your 90s.
This image shows the muscle groups most used when you squat. If you add some weights, then you can also include a few more upper body muscle groups.
THE BASICS OF THE SQUAT
Let’s take things step by step. The squat is only effective if you do it right, so don’t neglect mastering the art! Form is incredibly important, and centralizing the movement to activate the proper muscle groups is a fantastic way to affirm you’re doing it correctly.
In other words, you should feel the burn.
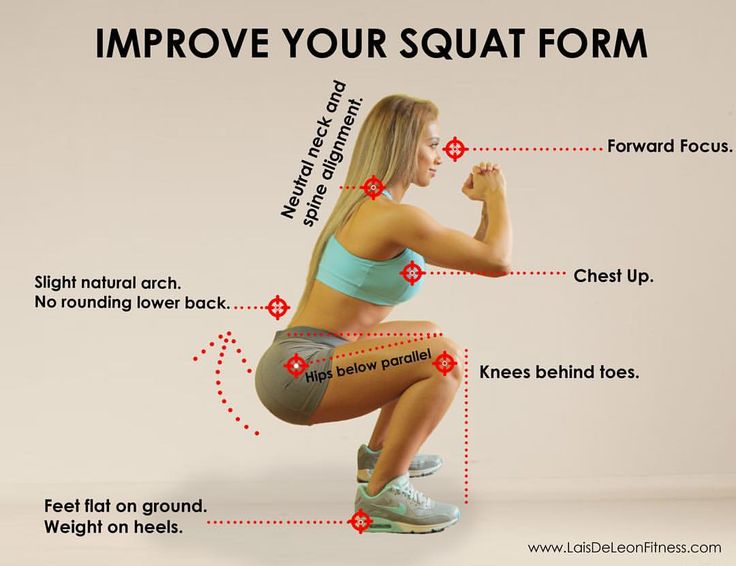
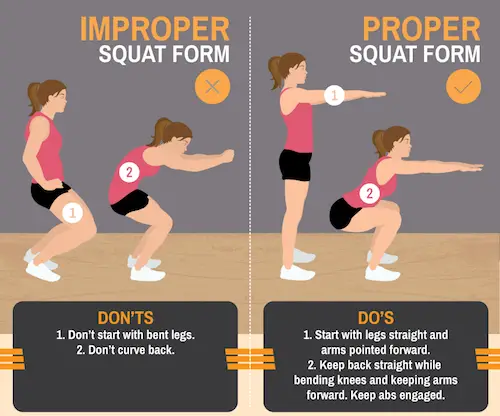
- Begin in a standing position with your feet around the same width as your shoulders.
- Move the hips back and bend the knees at the same time to descend into squat position.
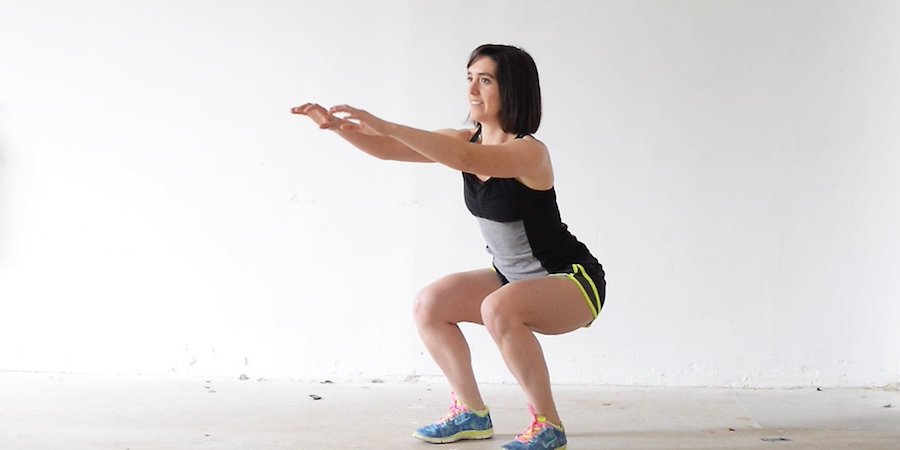
- Keep your back straight, knees and feet facing forward and heels on the ground. Keep your arms out straight, and your chest and face forward.
- Your knees should not go over your toes at the bottom but rather be in line with your toes. Imagine drawing a vertical line from your knee to your third or fourth toe. It should be a straight line. If your knees go too far forward over the toes, bring them back in line; if they rotate inwards, make sure to open them up so they are in line with your feet and toes. Ensure you’re keeping your back straight in position and your spine long, don’t collapse forward too much.
- Return to the standing position, using your quads to power up and squeezing the glutes as you get back to the standing position.
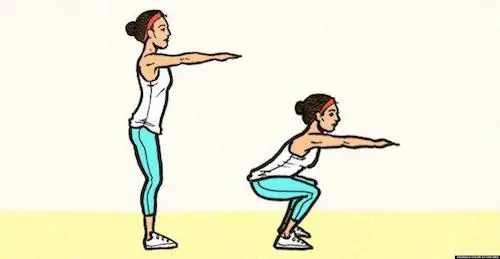
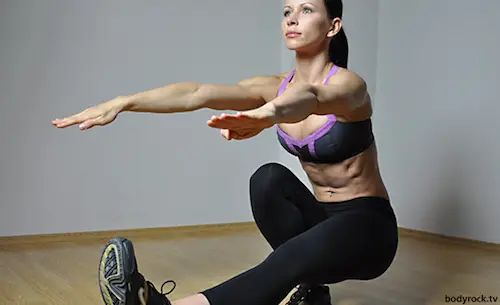
There are two ways to squat – parallel and below parallel. In the illustration above, you see a squat at parallel which means you’re bending at around a 90-degree angle at the hips. A squat at below parallel (see below) – otherwise known as “ass to grass” – means your bum will touch the back of your calves.
Neither of these is right nor wrong. Your ideal squat will depend on whether or not you’re bearing weight, the weight you are bearing, your mobility and/or your level of fitness overall.
You’ll know when your squat is wrong
Some common mistakes can easily be identified by pain. Overall, your squat should not feel painful. Take notice if you feel strain in your ankles, knees or hips i.e. the places you’re going to be hinging and adding stress to.
Your knees should point outwards (like your toes are) and not cave in nor flop out. Your ankles should also remain tight and stable, as you’re relying on their balance to keep you down and pull you back up.
Your hips might feel tight and sore, which is why stretching, foam rolling and rest days are important. In this case, you can move your feet out a little further in starting position, which tends to take some of the pressure from the hips during the exercise.
Another mistake that can make your squat ineffective and feel far less pleasant is leaning too far forward in squat position, descending too quickly (especially when bearing weight), releasing tension in the core during the exercise or straining your back.
Squatting with weight is an easy way to back injury in particular, because a heavy bar on your shoulders makes you want to arch your back inwards. Avoid this at all costs – even during body weight squats.
All in all, your entire body should be engaged, tight and straight. You don’t want your position to change at all during the exercise.
VARIATIONS OF THE SQUAT
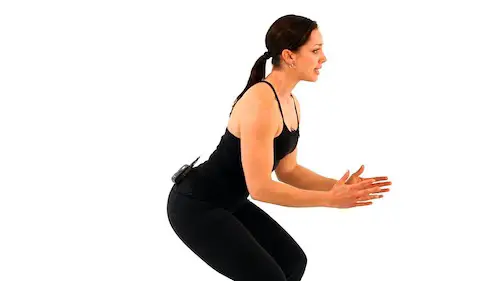
Low and slow squats
This is that below parallel squat we’re talking about. Rushing your descent or ascent can be outright dangerous, so if you really want to practize form and get a good burn, this is IT.
You want to reach depth while keeping your back straight and knees from walking. Take it easy, which will really encourage your muscles to engage.
Pulse and pause squats
At the bottom of your squat, pull the glutes up to pulse the primary engaged muscles, including the quads. Pause at the bottom focusing on serious stability, and return to the starting position.
Against the wall squats
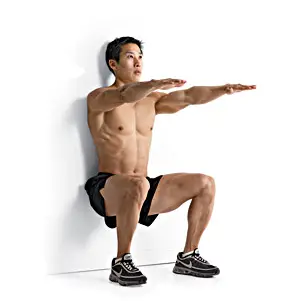
If you’re feeling tight in the hips or like your form is lacking, this is a brutal variation that will help you to master your form as well as get in a good workout. Stand with your back pressed against the wall, and your feet about three feet away from it.
Your goal will be for your knees not to bend past your toes, so adjust form accordingly. Continue in squat position until your thighs reach horizontal, so hips will be around at a 90-degree angle.
The pistol squat
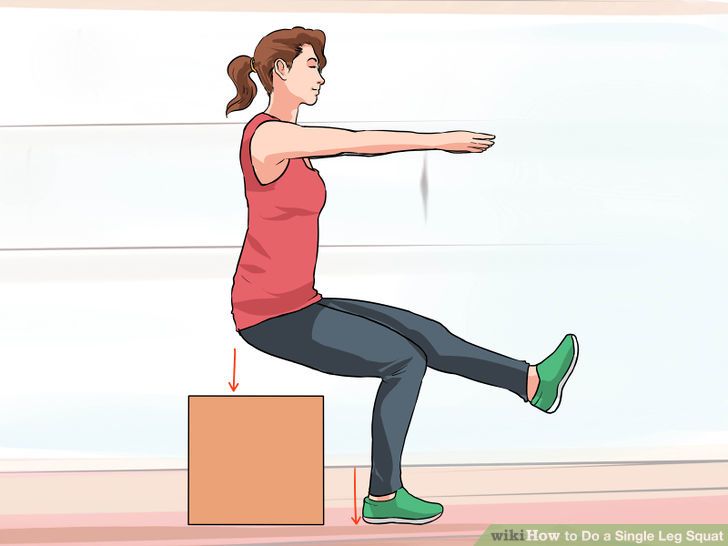
This is the one-legged squat, and it’s tough stuff! You’ll want to maintain the same exact form, but you’ll only use one leg. As you move into the squat position from starting position, you’ll lift your leg up from the floor.
At the bottom of your squat, your leg will stick straight out. This is the squat in the photo above. You will also want to use your arms to keep your balance. The beginner’s version of this exercise could include a bench to rest your bum on when you hit depth.
It can also be easier with a weight – such as a kettlebell – in one arm. Learn more how to do a single leg squat here.
Wide-stance plie or sumo squat
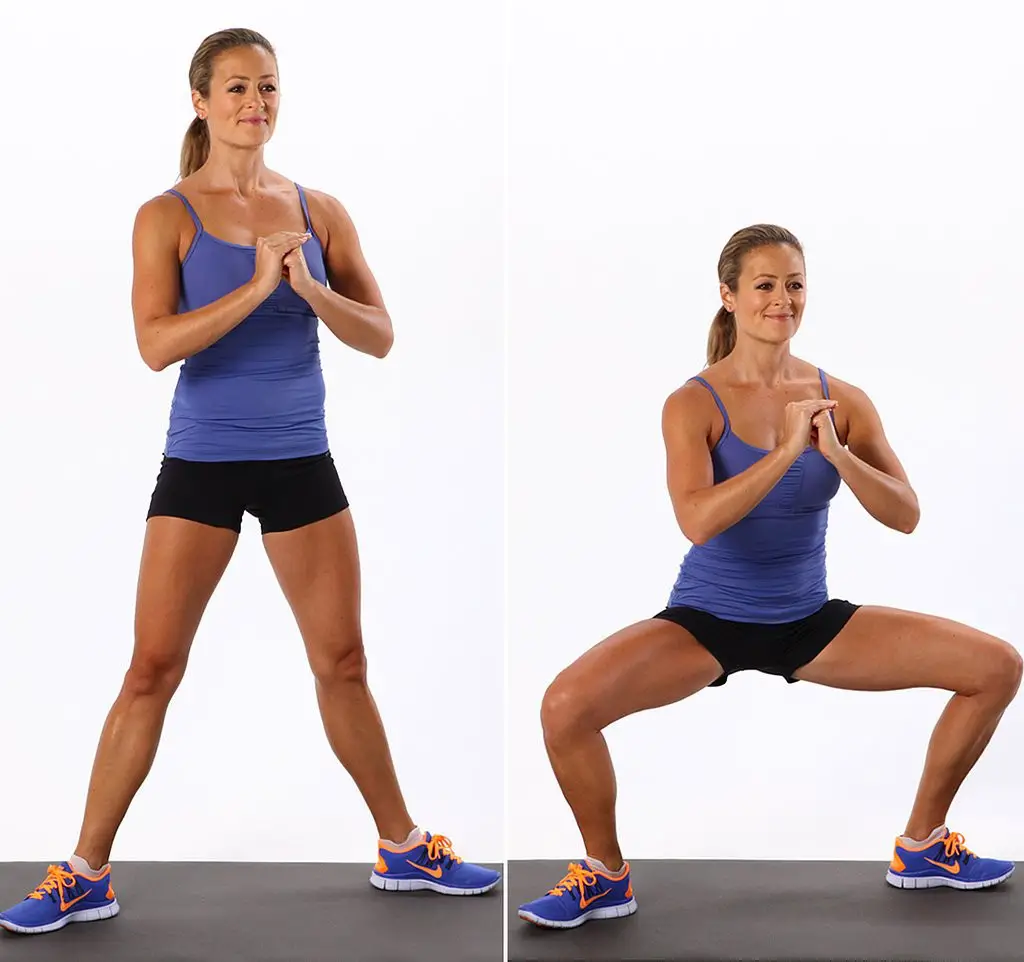
This one is fantastic for the inner thighs which is a pretty popular “problem area.” This squat simply assumes a different, wider stance starting position. The feet will be wider than the shoulders, which we mentioned above can be great for those who experience limited mobility at their hinge too!
Simply come down, keeping the same standard and safe squat form, and pull back up. You’ll feel more engagement in your inner thighs in this position than you do your quads.
Jump squats
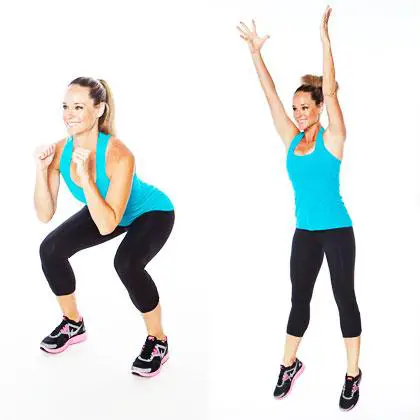
This is simply a squat, except every time you return to starting position, you’ll jump at the top. A helpful tip is to reach your arms up as you jump to keep rhythm and balance in-tact.
This is tough, but it’s a great addition to high-intensity interval training.
Narrow squat
Unlike the plie squat, the narrow squat asks you to take your feet in much more closely to one another. Place your feet side by side and assume squat position.
It won’t feel so natural, so pay attention to your form, making sure it isn’t differing. It can be a challenge to hit depth on this one while making sure your body stays tight and forward-facing.
ADDING WEIGHT TO YOUR SQUAT

There are many ways you can increase the intensity of your squat by adding weight. Whether you have access to a full gym or you’re more of a workout-at-home kind of person, adding weight can be great for adding muscle, toning up and just challenging yourself overall.
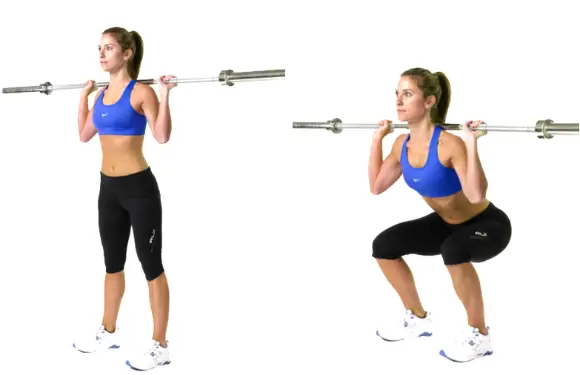
The barbell back squat
This is the variation pictured above. Generally, you’ll be in a rack which provides some safety measures (i.e. bars to rest the weight if you fail your squat). You want to place the bar on your back.
No matter how much weight is racked on either side, this should not hurt; it should rest in between your shoulder blades comfortably. Then, you want to bend at the elbows and hold the bar from behind.
The width of your arms will vary, but don’t hold them too wide. Finally, you will resume your squat with even more of an emphasis on form. You should always begin this exercise by warming up with just the bar, gradually adding weight up to your working rep weight.
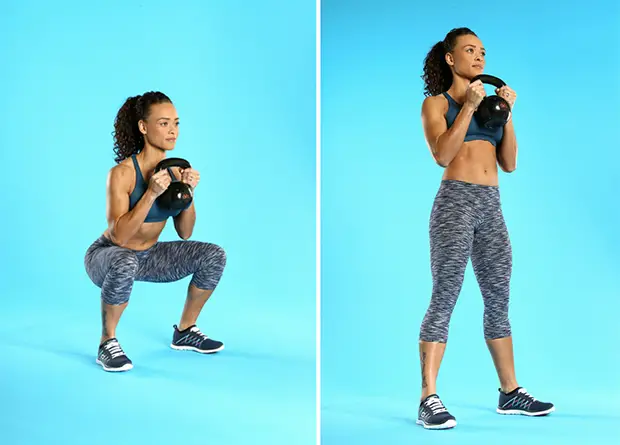
Kettlebell squats
Kettlebells are an amazing tool, and you can easily (and affordably) add one or two to your home gym – even if you’re strapped for space. The kettlebell offers a few weighted squat options.
First, you could practice goblet squats. You will rack your kettlebell up with one arm, and hold it with both, elbows bent, in the centre of your chest. Then, you will squat as usual. This can actually be super helpful in hitting depth, as it’s both centred and weighing you down.
Alternatively, you can rack two kettlebells from the floor in either arm, and do a double kettlebell squat. Ouch! It burns. So good. Read more about our favorite kettlebell workouts.
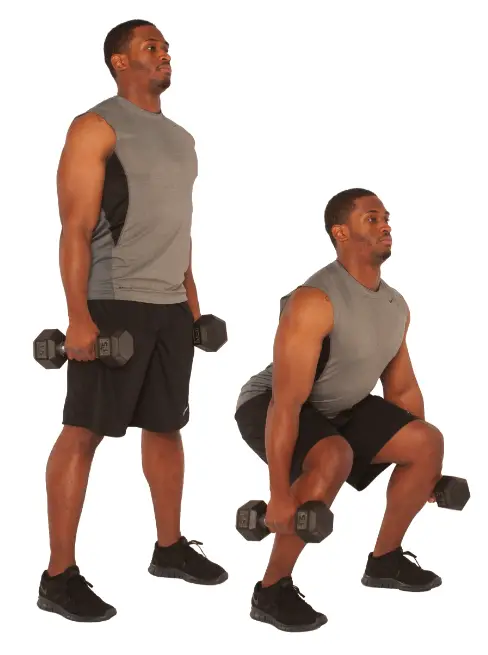
Dumbbell squats
These work in much the same way as kettlebells. You can do goblets or double kettlebell squats in much the same way. With a dumbbell, you’ll want to hold it in the middle.
The purpose is the same, roughly – to balance, centre and weigh you down. For a double squat, you want to hold the bells in the middle right above your shoulders.
Sandbag squats
The sandbag is a functional fitness tool that you can DIY or buy, like this one here. You want to start by picking up the sandbag in a “bear hug” fashion from the ground, holding it tightly in front of you.
Then squat as normal, and bring it back up.
Take on the 30-day squat challenge!
And now for the challenge! You could devise something based on the above, starting out with just basic squats and increasing the repetition each day; then moving into including some variations and then advancing to adding some weights as well.
You can always add weight to the body weight squats if you have access to it, or if you are working at a gym with a barbell. For the sake of accessibility, there will be no barbell-specific workouts in our challenge.
You can choose to do your workout all at once, add in the squats on top of your current routine or just aim to meet your quota throughout the day. Commercial break squat intervals are a totally valid way of getting in those reps!
Break it down and modify the challenge into manageable chunks for your fitness level and time restraints.
If you’re doing each day’s exercises in one go, feel free to break them down into sets and allow a short rest in between moves.
Before doing a full set of daily squats, it’s a good idea to warm up by doing a minute of start jumps on running on the spot. Stretching at the end of the session or at the end of the day will help to prevent muscle soreness and recovery.
Below are some basic stretches for the muscle groups worked during a squat.
30-Day Squat Challenge
Day 1: 30 basic body weight squats (these can be done in 3 sets of 10)
Day 2: 25 basic body weight squats + 10 low and slow squats (these can be done as sets of 10 + 15 + 10 )
Day 3: 30 basic body weight squats + 10 pulse and pause squats + 5 low and slow squats (these can be down as 2 x 15 sets + 10 + 5)
Day 4: 30 basic body weight squats + 10 jump squats + 10 wide-stance plie/sumo squats
Day 5: REST DAY
Day 6: 35 body weight squats + 20 wide-stance plie/sumo squat + 5 low and slow squats
Day 7: 40 body weight squats + 20 narrow squats + 5 jump squats
Day 8: 50 body weight squats + 15 low and slow squats (add weight if possible)
Day 9: 50 body weight squats + 20 wide-stance plie/sumo squats (add weight if possible)
Day 10: REST DAY
Day 11: 50 body weight squats + 25 narrow-stance squats (add weight if possible)
Day 12: 60 body weight squats + 20 jump squats + 5 low and slow squats
Day 13: 65 body weight squats + 20 pulse and pause squats + 10 wide-stance plie/sume squats (add weight if possible)
Day 14: 70 body weight squats + 20 against-the-wall squats (pause for 5 seconds) + 5 low and slow squats
Day 15: REST DAY
Day 16: 75 body weight squats + 25 low and slow squats (add weight if possible)
Day 17: 80 body weight squats + 30 jump squats
Day 18: 80 body weight squats + 35 wide-stance plie/sumo squats (add weight if possible)
Day 19: 85 body weight squats + 35 pause and pulse squats (add weight if possible)
Day 20: REST DAY
Day 21: 90 body weight squats + 20 against-the-wall squats + 10 wide-stance plie/sumo squats (add weight if possible)
Day 22: 90 body weight squats (add weight if possible) + 20 single leg/pistol squats (10 each leg, using a chair for assistance)
Day 23: 90 body weight squats + 30 jump squats + 20 wide-stance plie/sumo squats
Day 24: 100 body weight squats + 20 single leg/pistol squats (10 each leg, using a chair for assistance) + 30 pause and pulse squats (add weight if possible)
Day 25: REST DAY
Day 26: 110 body weight squats + 50 wide-stance plie/sumo squats (add weight if possible)
Day 27: 115 body weight squats + 30 against-the-wall squats (5 second pause) + 15 narrows squats (with weight)
Day 28: 120 body weight squats + 30 against-the-wall squats (5 second pause) + 20 single leg/pistol squats (10 each, using a chair)
Day 29: 125 body weight squats + 30 low and slow squats + 30 jump squats
Day 30: REST DAY (and your final day!)
It might look tough, and it will get challenging, but we are sure you can do it! Are you ready to take on the challenge? Share this with your friends to recruit some workout buddies and keep each other accountable.
Music, mountains, dogs, travel, food and friends.