Living up to its name, cloud bread is super light and fluffy. I have no idea who came up with the original recipe, or how the name came to be, but it has become the ‘must-try’ food in the low-carb and wellness circles.
In today’s post, I’ll show you how to make delicious savory cloud breads with chives and pepper. P.S. This is cloud bread without cream of tartar.
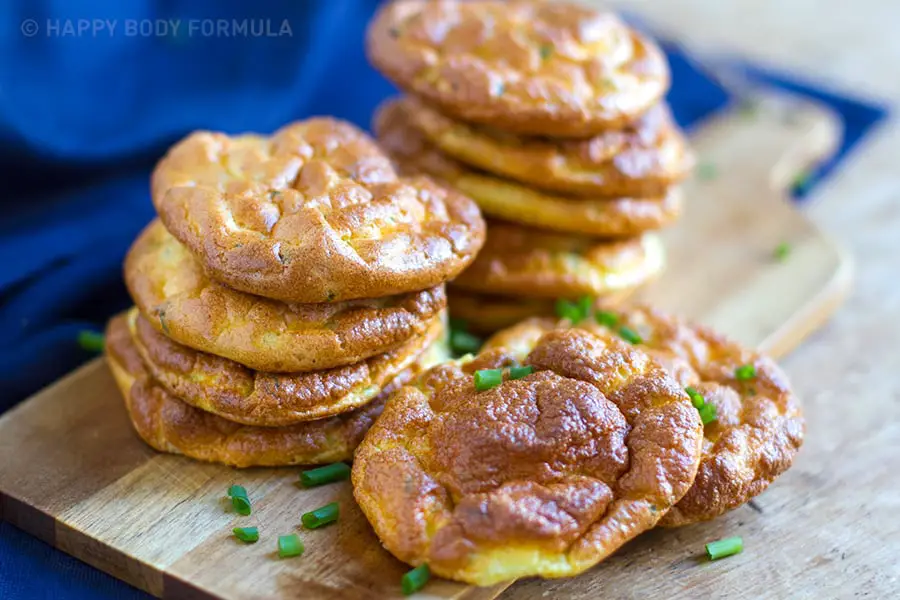
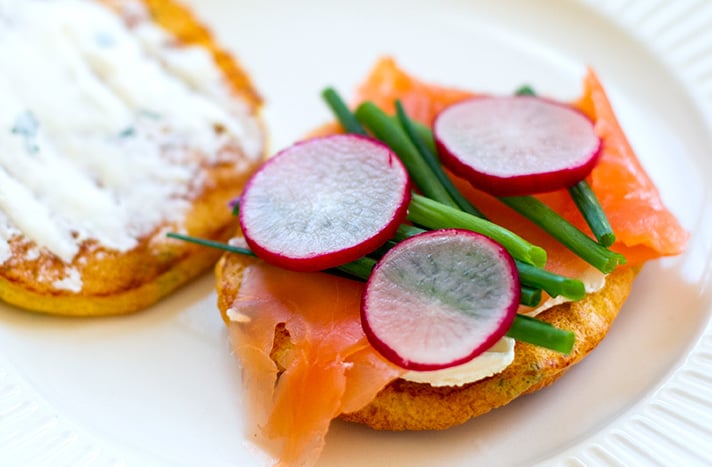
What’s really good about these little pancake-like clouds of goodness is they are a perfect substitute to bread-y foods like sandwich slices or burger buns.
Cloud bread is very low in carbohydrates while being high in protein and healthy fats. You can eat it as is, with a lovely crisp salad, or top it with your favorite ingredients such as smoked salmon and cucumber or good quality ham.

Cloud bread variations
The basic recipe for cloud bread calls for only three ingredients – eggs, cream cheese and cream of tartar (or anything acidic basically – I used some apple cider vinegar to stabilize the egg whites).
You can then add your favorite additions such as chopped fresh herbs or a little honey for a sweet version. I used chives and pepper in my version.
If you can’t tolerate dairy, you might be able to use cashew based cream cheese alternative. I haven’t tried it, but I would be curious to see how that turns out.
If anyone wants to make a small batch, do let us know if it worked. Apparently cottage cheese or ricotta will also work.
Shop for key ingredients on Amazon: free-range, grass-fed non GMO chicken eggs, apple cider vinegar, cream cheese, baking paper, coconut oil.
Enjoy guys!

- 3 eggs, separated
- 3 tablespoons cream cheese
- 3 tablespoons chopped chives (or scallions/green onion)
- ½ teaspoon white or black pepper
- Pinch of salt
- 1 teaspoon apple cider vinegar or white vinegar
- Coconut oil and baking paper
- Preheat the oven to 150 C/ 300 F (conventional). Lightly grease a large piece of parchment baking paper with coconut oil or olive oil and layer over a flat baking tray. You might need to use two trays depending on the size. Set aside.
- Carefully separate the eggs, making sure there are not yolks in the whites. Add the egg whites to a large glass or stainless steel bowl and the egg yolks to another smaller bowl.
- Add the cream cheese, chives, pepper and salt to the yolks and set aside.
- Add a teaspoon of apple cider vinegar to the eggs whites. You can also add a tiny pinch of salt. Beat the whites with an electric whisk on high speed until stiff peaks. You should be able to turn the bowl over with the egg whites moving. Set aside.
- Using the same whisk, no need to wash, mix together the yolk mixture until smooth and creamy.
- Fold the egg yolk mixture into the egg whites gradually. Be gentle and try not to over mix as this will break down the air bubbles in the whites.
- Using a large spoon or a quarter cup, scoop the mixture into even rounds on the sheet, think a small pancake or a cookie, however you can also make them burger bun diameter. The will flatten and spread slightly so allow for some room between the breads.
- Bake on the middle rack for about 20-25 minutes. This will vary if you’re baking on two trays and need to rotate those half way for even cooking. In some cases, these will be ready in 25-30 minutes. Keep an eye on them at the 20-minute mark.
- Remove from the oven and cool slightly before peeling them off the baking sheets. You can slide a knife or a spatula under each cake to get it off.
- While still warm, they will resemble a cooked meringue, but slightly denser but this texture will change as they cool down completely. Once refrigerated for a few hours or overnight, they will become more bread like. You can store them in a zip lock bag or an air-tight container for 2-3 days.
Want more recipes like this?
 Is life getting in the way of your goals to eat healthier and feel better?
We know it’s hard to stay on track when you’re tired and busy during the week. We often make bad choices when unplanned and unprepared.
That’s why we created our make ahead meal plans, complete with real food recipes and shopping lists that will cover you for five dinners, lunches and breakfasts.
We believe that planning and preparing meals ahead of time is your best strategy towards healthier eating. Get the 7 Day Meal Plan Today.
Music, mountains, dogs, travel, food and friends.
These look like a great alternative to chips etc at parties. I would love to try it with a nut cream instead of cream cheese! xx
I am hopeful that it would work! You’ll have to share your version if you test it out 🙂
These where in Doctor Atkins original diet book years and years ago like twenty years ago i would say they where invented by him
That sounds about right! I was wondering how far back they go.
This sounds fluffy and heavenly! Thank you 🙂
Fluff in all the right places! 😉 Enjoy!!!
These are great! Definitely going to become a staple in our house! ????
They looks really light! Just like you describe them, they are like clouds. Flavorful cheesy clouds! NOM!
The best kind of clouds! 😉
I don’t understand what to do with the baking sheet and parchment paper – “and layer over a flat baking tray” HELP
Donna,
Just place the parchment over your baking sheet. This will ensure that the breads don’t stick!
These sound amazing! I love these types of bread and love using them to dip!
Very useful and tasty !! I’m going to use them this weekend!
I’ve been wanting to try cloud bread!! This looks like such a nice, easy recipe! Has anybody actually tried it with non-dairy cheese yet? I’m interested to see how it’ll turn out.
Very budget friendly recipe! This is also another low carb recipe to add to the collection. Perfect for breakfast or snack- huge hit at the office!
I have tried several variations of cloud bread but this will be my go to recipe from now on! They were a mild flavor great for toppings and I baked them a tad bit longer to get crispier.
These taste great in dip and have become a staple at our parties. I love how light and fluffy they are!
These are great alternatives to chips in a bag. I had my coworkers asking me where I got these from just to tell them they were homemade. Plus, I love being able to dip or top them.
I love the sweet version! Great for snacks.. the family will surely love it and the kids will long for it after they tasted it!
This look tasty and fluffy. Can’t wait to try it!
Very tasty and easy to cook. Can’t wait to cook it again
Great taste and very healthy. I will be making this again